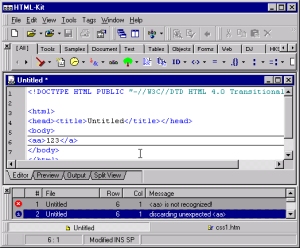
Using the following screen shot of HTML-Kit, you can view details about a
particular section of HTML-Kit by touching (clicking) the area
you're interest in. This document assumes that you're using the latest HTML-Kit build.
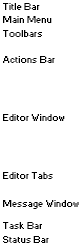
 Title
Bar
Title
Bar
HTML-Kit's title bar is similar to any other title bar of a standard Windows
application. You can maximize or restore HTML-Kit to its normal size by double
clicking the center of the title bar. Right clicking the title bar will invoke a
menu with other available options.
Main
Menu
Most features of HTML-Kit are accessible from the main menu. Use the mouse to
select a menu or press one of the underlined characters while holding the
Alt key to invoke a specific menu using the keyboard. For example, Alt+F
will invoke the "File" menu.
Moving: The location of the main menu can be changed by dragging it by its handle
(leftmost or topmost bar) and dropping on any one of the four outermost corners
of the HTML-Kit window. You can also leave the main menu floating. Once the menu is
positioned to your liking, "Edit | Preferences... | Misc. | Allow customizing menus and toolbars"
option can be unchecked to avoid accidental changes to the menu position.
Customizing: The main menu can be configured by selecting "Tools | Customize |
Customize Menus and Toolbars..." When the "Customize" dialog box
appears, change to the "Commands" tab and drag-and-drop items in the
"Commands" list box on the main menu to customize it. To customize a
specific menu item, select it using the main menu while the "Customize"
dialog box is visible and right click the menu option to edit it. To remove an
item from the main menu, drag it from the main menu and drop on the Customize
dialog box.
If you choose to customize the main menu, note that it will be reset
to the default menu when you install updates to HTML-Kit. To restore your main
menu and menu toolbar settings,
save your settings using "Tools | Customize | Save Custom Settings..."
and load them back after running the HTML-Kit setup program. It is strongly
recommended that you reset the main menu afterwards ("Tools | Customize |
Reset Main Menu"), so that any new items added to the main menu will not be
hidden by your previous settings. Resetting the main menu will not change menu
toolbar settings.
Toolbars
Toolbars provide easy and one-click access to frequently used
functions. Default toolbars provide access to file, edit,
windows and other tools related functions.
Moving: The location of individual toolbars can be changed by dragging them by the
handle (leftmost or topmost bar) and dropping on any one of the four outermost
corners of the HTML-Kit window. You can also leave toolbars floating. Once toolbars are
positioned to your liking, "Edit | Preferences... | Misc. | Allow customizing menus and toolbars"
option can be unchecked to avoid accidental changes to toolbar positions.
Customizing: You can create your own toolbars or customize default toolbars by selecting
"Tools | Customize | Customize Menus and Toolbars..." from the main
menu. Once the "Customize" dialog box appears, change to the
"Commands" tab and drag-and-drop items in the "Commands"
list box on the toolbars to customize them. To remove an item from a toolbar,
drag it from the toolbar and drop on the Customize dialog box. To create a new
toolbar, change to the "Toolbars" tab and click "New."
Additional help: Slowly moving the mouse pointer over toolbar icons
(or buttons) will display on-screen descriptions (hints) of each item.
Actions
Bar
The HTML-Kit Actions Bar contain over 100 shortcuts to HTML, CSS, JavaScript,
VBScript, PHP, validators, online tools, and custom plugins.
Buttons (also known as plugins) on the Actions Bar are divided into multiple
categories (sometimes referred to as tabs). For example, the "Tables"
tab contain shortcuts related to creating HTML tables, the "Objects"
tab contain anchor, image, JavaScript and Java tags, and the "Web" tab
provides access to online tools found on the web. For a demonstration, open a
new editor and click the "Date Time" button (yellow clock icon) to
insert the current date and time. The format of the time can be selected by
clicking the down arrow next to the Date Time plugin.
You can change tabs by directly clicking on the tab itself, or by right clicking
the Actions Bar and selecting the "Tabs" sub menu. The Actions Bar has support for the mouse wheel to quickly scroll through
tabs and items on them. Hold down the CTRL key while scrolling to change tabs.
Moving: Similar to the main menu and toolbars, the Actions Bar can be docked on to
any one of the four corners or left floating. In addition, it can be hidden by
clicking the close button (the "X" icon) and made visible again using
the "View | Actions Bar" menu item. To quickly change the docked position, right
click the Actions Bar and select top, bottom, right, left or float from the "Dock Position"
sub menu.
Customizing: You can group all your favorite plugins onto a single tab
by right clicking the button you're interested in and selecting "Add to
Favorites." Your favorite plugins will now appear under the
"[Favorites]" tab. To remove an item from the favorites, right click
on it and select "Remove from Favorites."
The "[All]" tab can be hidden by unchecking the "Edit |
Preferences... | Actions Bar | Show All tab" option.
You can create your own shortcuts and other tools and add them to the Actions Bar as
documented on the Plugin Developer's Guide.
Additional help: Slowly moving the mouse pointer over Actions Bar
buttons will display on-screen descriptions (hints) of each item. To get more
details, right click the button and select "Plugin Information..."
Editor
Window
This is where the actual editing takes place. You can open a new editor
window by selecting "File | New..." from the main menu, or open an
existing file by selecting "File | Open File..." A remote web page can
be imported to the editor by using "File | Open URL..."
A "*" next to the name of the document is an indication that it has
not been saved since the last modification.
Customizing: Select "Edit | Preferences... | Editor" to configure editor
settings. Or you can right click the editor to get to its properties.
Editor
Tabs
Every HTML-Kit editor has four tabs -- "Editor,"
"Preview," "Output" and "Split View" -- to allow
quick access to main editor modes.
Editor: The "Editor" tab is the default mode. It simply focuses the editor
window where you can edit your HTML and other documents.
Preview: The "Preview" tab can be used to preview (or browse) the content in
the editor window. The F12 shortcut key can be used to quickly toggle between
the editor and the preview. Ctrl+F12 can be used to toggle through all editor tabs.
Output: The "Output" tab is used to view the results produced by recently
called plugins such as validators and other similar tools. For example, if you
validate your document using "Tools | Check Code Using TIDY," the validated HTML code will be displayed in the Output window without
directly modifying your original code. The Output window is generally empty,
except immediately after calling a tool that would generate an output as
explained above.
Split View: The "Split View" tab is used to view the content of the Editor
window and the Output window side-by-side for easy comparison. A better way to
learn the usefulness of the Output and Split View tabs is to validate
your document.
Customizing: You can configure the Split View mode to split windows
vertically (default) or horizontally by going to the "View | Editor"
menu. Once you become familiar with HTML-Kit and its shortcut
keys, you can hide the current editor's toolbars if necessary to get more editing
space by selecting "View | Editor | Show Tabs Bar." or
"Edit | Preferences... | Editor | Show tabs" which will affect new documents.
Message
Window
The Message Window is used to display errors, warnings and other notes about
the document in the editor, for example after validating it.
Clicking an item in the message window will highlight the line in the editor
that caused the error or other message. Double clicking an item will take you to
the editor and place the cursor near the related item. Right clicking an item
will invoke a menu with additional options.
The message window is generally empty, except immediately after invoking a
plugin that utilizes the message window to display errors and warnings such as validators.
Moving: The message window can be moved to the top or the bottom edge
of the HTML-Kit window by dragging the message window by its handle. It can be hidden by clicking the close button (the
"X" icon) and made visible again using the "View | Messages"
menu item.
Task
Bar
The Task Bar can be used to quickly jump to a particular editor or browser window, when
you have multiple documents open at the same time. Click on the name of the
document you wish to focus or move the mouse over the name to view the full path
of that document. Right click the name for more options related to the window such as
close, save, show, print, preview, etc. The icons to the left of the Task Bar can be
used to toggle the Messages Window, the Actions Bar and the Workspace.
Clicking the "Manage Open Windows" icon will allow batch managing of current windows.
An icon with a check mark near the document name indicates a saved document.
An icon without a check mark is an indication that the document has not been saved since the last
modification. Yellow icons are used to display local file names while blue icons are used
for remote files. An icon with the world is used to indicate browser windows.
Moving: The Task Bar can be moved to the top or the bottom of the HTML-Kit window by dragging it by its handle.
It can be hidden using the "View | Task Bar" menu item.
Status
Bar
The Status Bar is used to display help messages and other status information
related to the current action you're performing or the current state of
HTML-Kit. For example, hints about menu items will be
displayed on the status bar as you move your move over them.
When an editor window is open, the first window in the status bar displays the
position of the cursor in the "row : column" format.
The second window will display certain status indicators such as:
"Modified" = Document has not been saved since the last modification.
"INS" = Editor is in the insert mode, "OVR" = in the overwrite mode.
"RO" = Document is read-only.
"SP" = Live spell checking is enabled.
Moving: The Status Bar can be moved to the top or the bottom of the HTML-Kit window or left floating by dragging it by its handle.
It can be hidden using the "View | Status Bar" menu item.